Installing Grid Infrastructure for a Standalone Server using oracle Restart
=====================================================
To partition the disks, perform the following steps:
To install Grid Infrastructure for single Server, perform the following steps:
To Configure EM Database Control to manage ASM, perform the following steps:
To Move the SPFILE for the ASM instance , perform the following steps:
=====================================================
To partition the disks, perform the following steps:
| 1. | Open a terminal window, and become the root OS user. Use the su - root command |
| 2. |
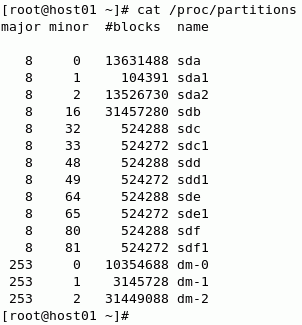
As the root user, determine the partitions available. the following command shows all the partitions known to the OS.
cat /proc/partitions
 |
3.
| Determine which devices will be partitioned. Use the fdisk <device_name> command for each disk/dev/sdc, /dev/sdd, /dev/sde, /dev/sdf and specify the values as shown in the screenshots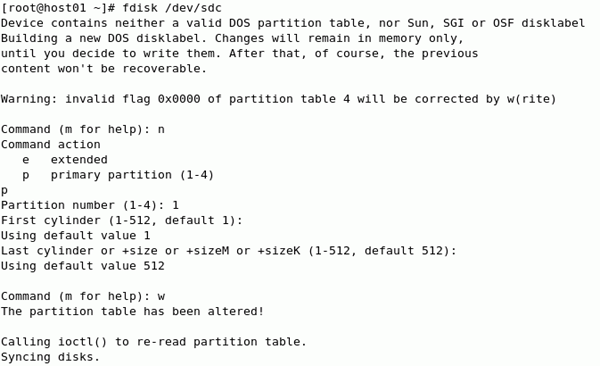 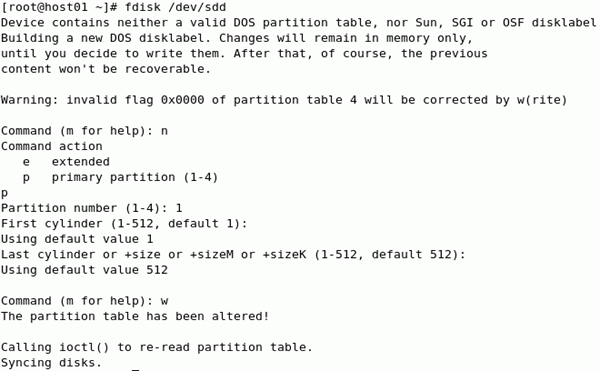 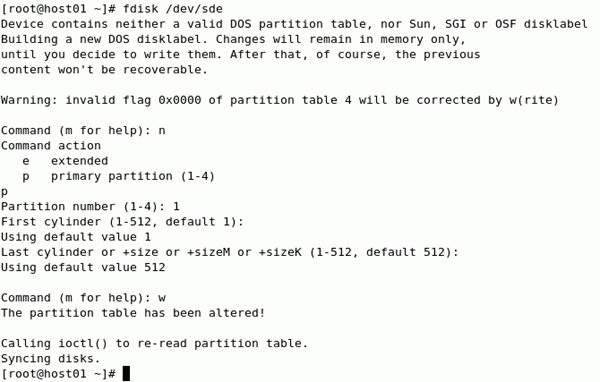 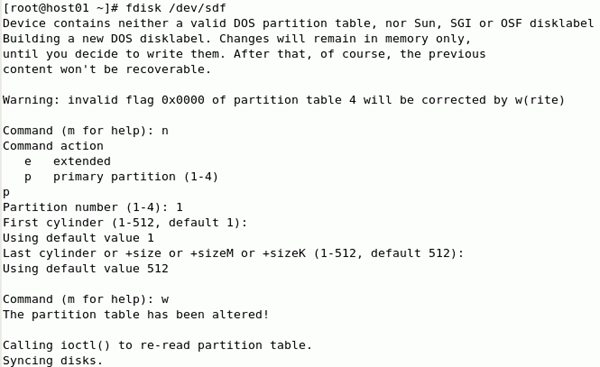 |
| 4. | Check that the expected partitions exist. Partitions named /dev/sdc1, /dev/sdd1, /dev/sde1, and /dev/sdf1should exist. Check by using
cat /proc/partitions
 |
To label the disks for use by ASM, perform the following steps:
| 1. | As the root user, configure oracleasm by using the command
oracleasm configure -i
and answer the prompts as shown in the screenshot.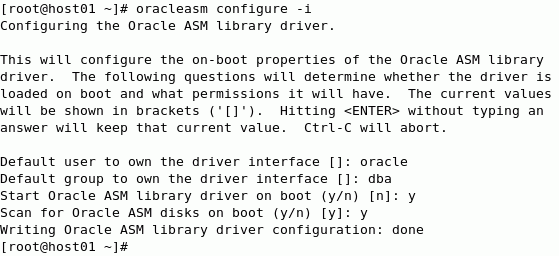 Note: When u install oracleasm configure error getting comment not found like we have to install oracleasmlib kernal packages 1: first u have to check ur kernal parameter what uname-r uname -p 2. after that u download corresponding rpm oracleasm-support oracleasmlib oracleasm-el5 After that u start same above step: it will work it out |
| 2. | Initialize the asmlib with the oracleasm init command. This command loads the oracleasm module and mounts the oracleasm filesystem. |
| 3. | Use the oracleasm createdisk <diskname> <device_name> command to create the ASM disk label for each disk. In this tutorial name the disks DATA1, DATA2, DATA3, and DATA4 as shown in the screenshot. 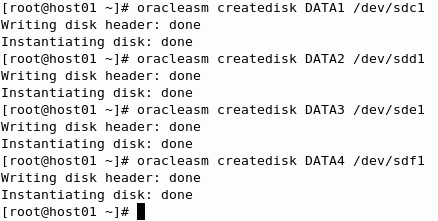 |
| 4. | Check that the disk are visible using the oracleasm listdisks command. |
| 5. | Check the the disks are mounted in the oracleasm filesystem with the command
ls -l /dev/oracleasm/disks
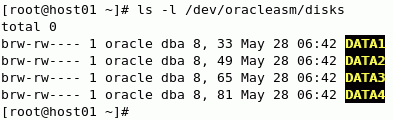 Once completed its disk not allocate in oracleasm disk means just reboot mechine and list out above comments |
In this topic you install the grid Infrastructure is a separate home directory. This separate home directory is a requirement for the Grid Infrastructure. You will use the Oracle Universal installer from the directory where the clusterware software is staged.
| Use OUI to Install the Grid Infrastructure | ||
| Configure EM Database control to manage ASM | ||
| 1. | Open a terminal window as the OS user named oracle. This is the user that will own the Grid Infrastructure Installation. Change directories to the location that the clusterware software is staged.
cd /stage/clusterware/Disk1
 |
| 2. | Start the installer with the command
./runInstaller
 |
| 3. | On the first screen of the installer, select Install and Configure Grid Infrastructure for a Standalone Server. ClickNext.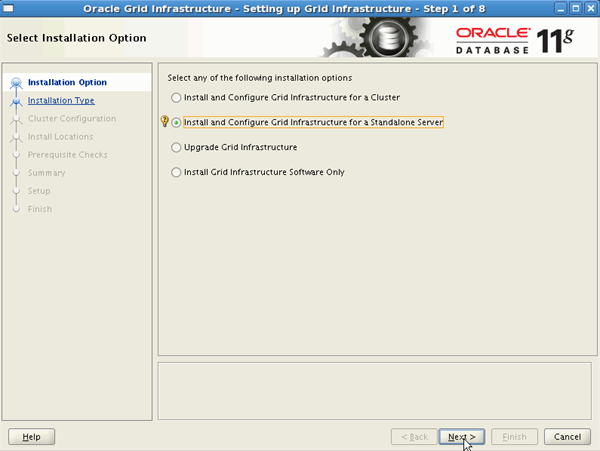 |
| 4. | On the Select Product Languages screen, select the languages that should be supported in this installation. For this tutorial click the 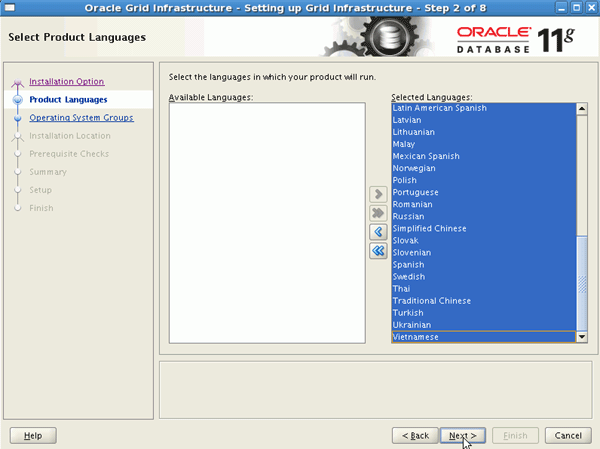 |
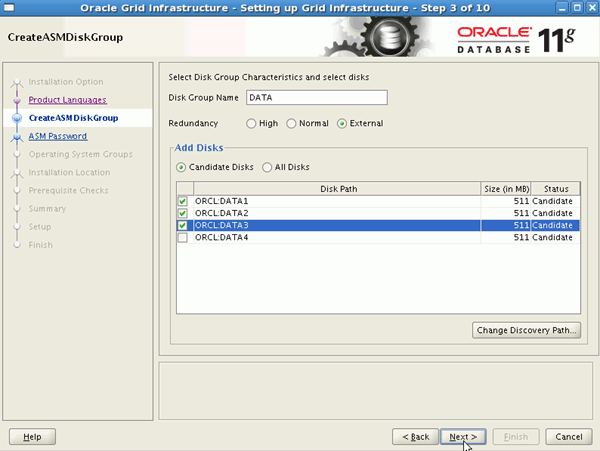
| 5. | On the CreateASMDiskGroup screen,
 |
| 6. | On the Specify ASM Password page,
 |
| 7. | On the Privileged Operating System Groups page,set each group to dba.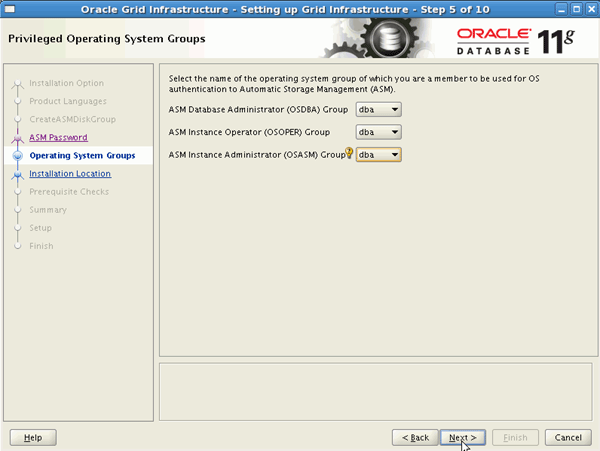 Note: these groups do not allow for job role separation. For this tutorial the database DBA and ASM administrator are assumed to be the same person, or have all the same privileges. A warning will appear. Click Yes. 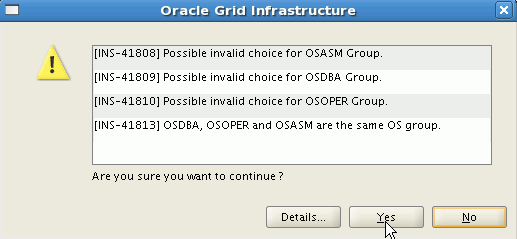 |
| 8. | On the Specify Installation Location page, the location of the database home will be shown
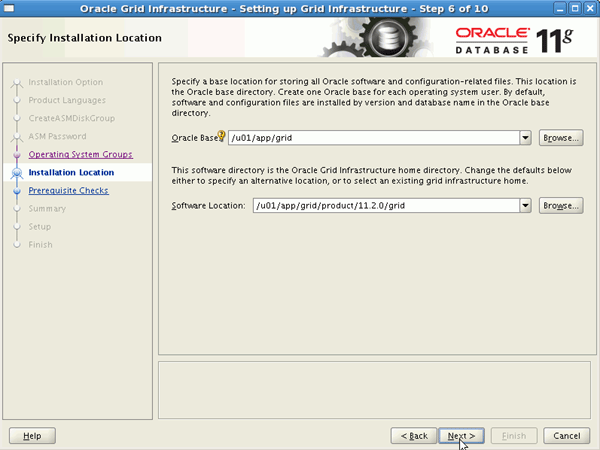 |
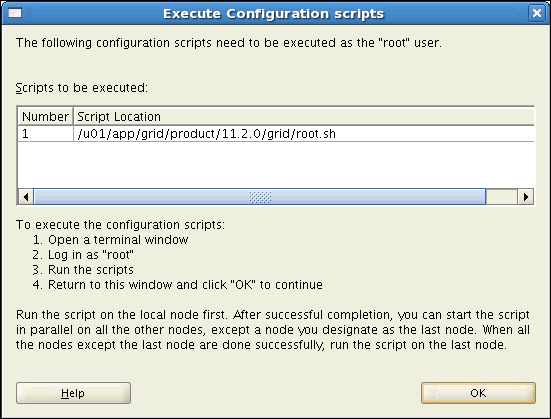
| 9. | The Perform Prerequisite Check page appears and completes the checks.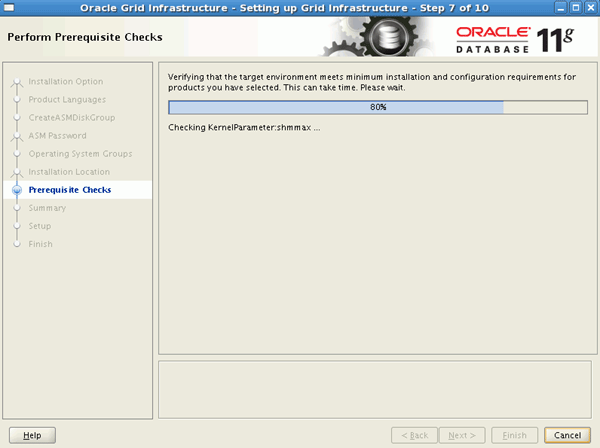 You may receive a failed RunLevel. This is ok. Select the Ignore All check box and click Next. 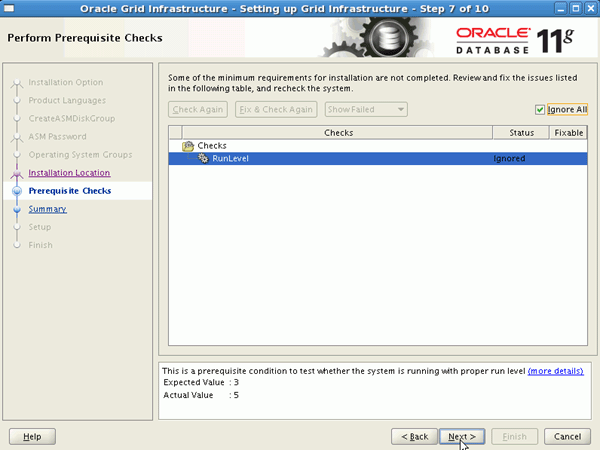 On the Summary page, the installation settings are shown. Click Finish to complete the installation. 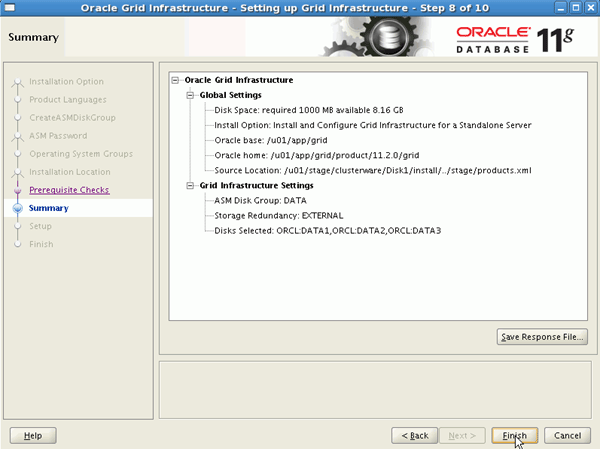 |
| 10. | The setup page shows the install progress.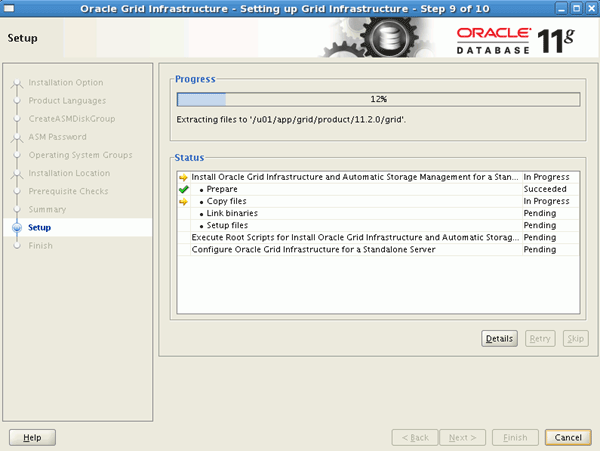

|
| 11. | When the Finish page appears, with the message "The installation of Oracle Grid Infrastructure for single Server was successful", click Close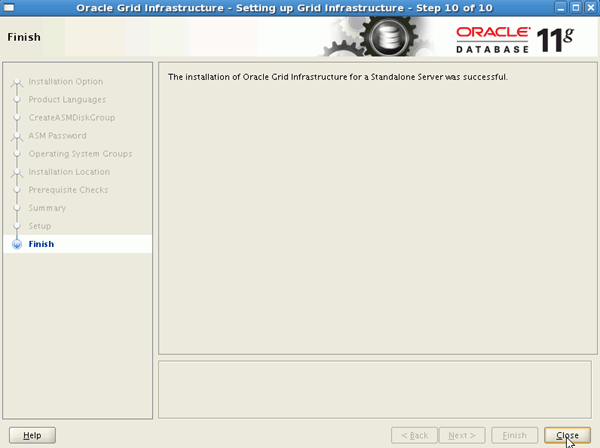 |
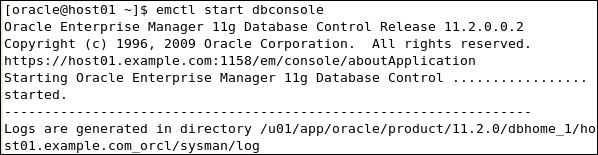
| 1. | To manage the ASM instance in Enterprise Manager Database Control. you must configure the ASM Instance as a target. When you configure the ASM target, you must provide the port for the ASM listener. The Grid Infrastructure installs a listener by default on port 1521, and configures the ASM instance to use this listener. In this tutorial the database is already installed and has a listener configured on port 1521, the Grid Infrastructure places a listener on port 1522 and the ASM instance is registered with the grid listener. In a terminal window as the oracle OS user, start EM database control with the command. If the console is already running the command will return "An instance of Oracle Enterprise Manager 11g Database Control is already running."
emctl start dbconsole
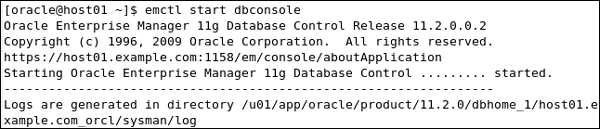 |
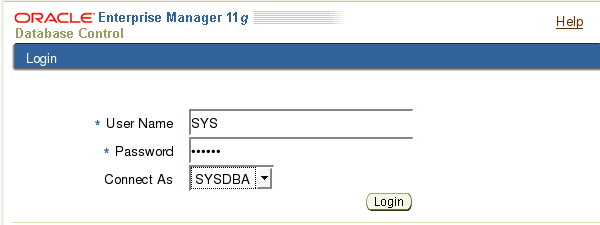
| 2. | View the EM database control home page. Invoke the browser and enter the URL https://host01.example.com:1158/em When the login page appears enter:
 The database instance home page appears: notice that the ASM target is absent from the expected position below Listener in the leftmost column. 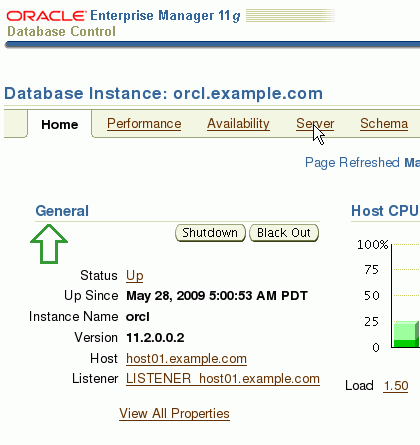 |
| 3.. | Configure the ASM Target in EM database control.
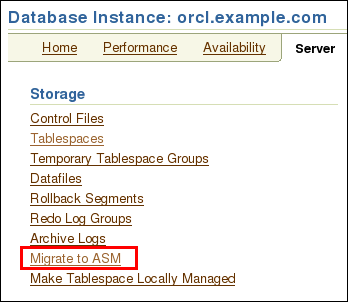 |
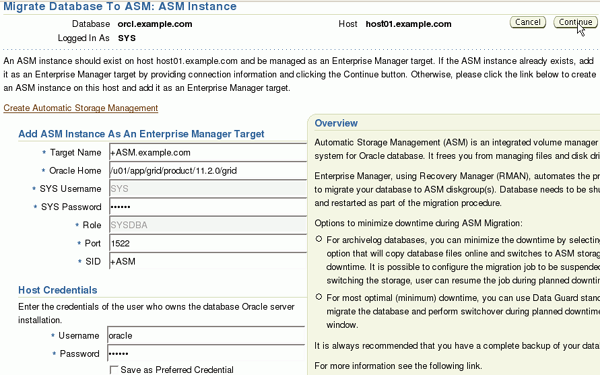
| 4 | On the Migrate Database to ASM : ASM Instance page, configure the ASM instance as a target.
 |
| 5. | On the Migrate Database To ASM: Migration Options page click Cancel. |
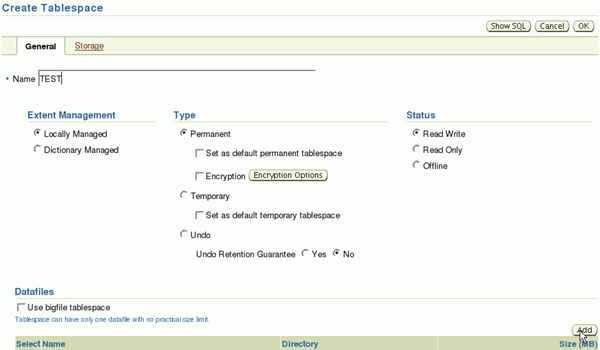
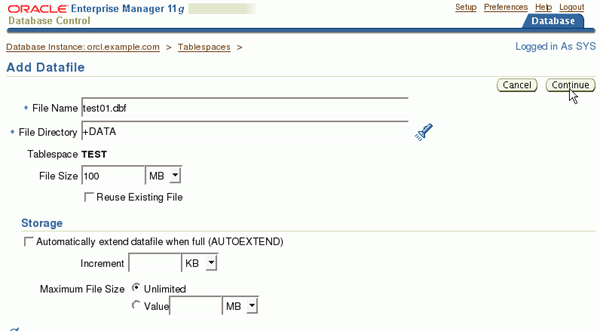
| 6. | Create a tablespace named test with datafile named test01.dbf in the DATA diskgroup of the ASM instance 1. On the Server page, in the Storage section, click Tablespaces 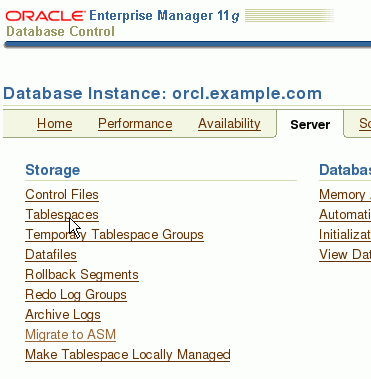 2. On the Tablespaces page, click Create. 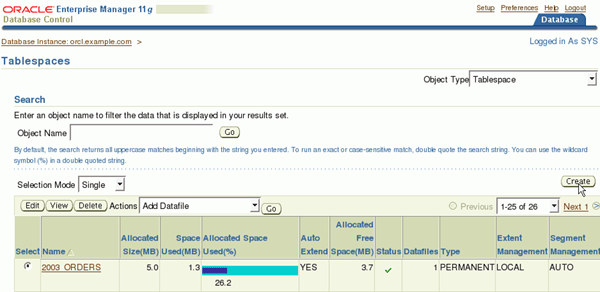 3. On the Create Tablespace page,
 4. On the Add Datafile page
 5. On the Create Tablespace page, click OK. 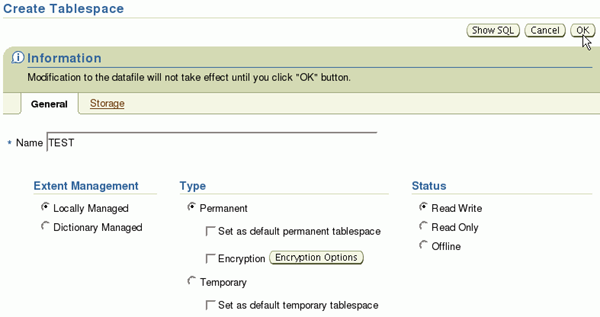 6. On the Tablespaces page confirm that the TEST tablespace has been created. Enter TEST in the search field and click Go. 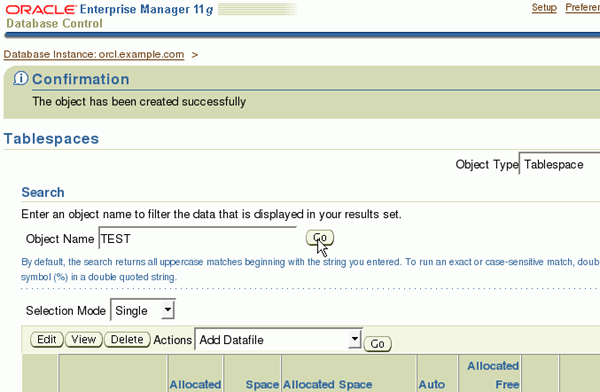 7. The tablespace was created and is in the list. 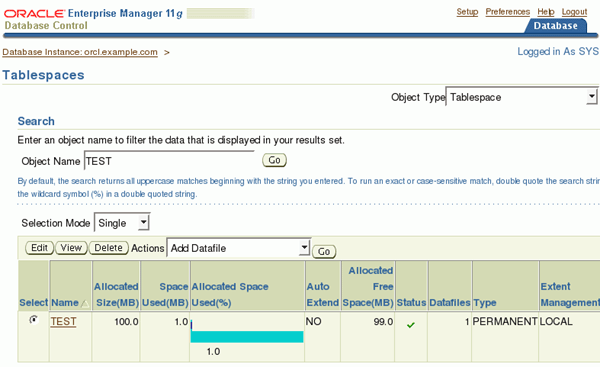 |
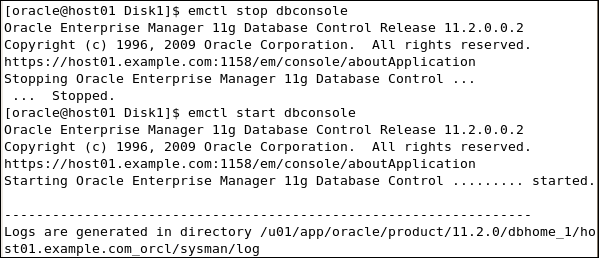
| 7. | In a terminal window as the oracle OS user stop, and restart EM database control with the commands.
emctl stop dbconsole
emctl start dbconsole
 |
| 8. | View the EM database instance home page, use the URL https: host01.example.com:1158/em Confirm that the ASM instance is now listed as a target. 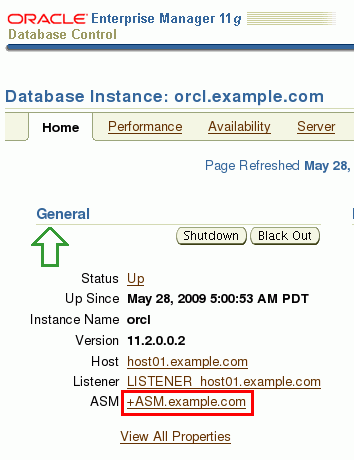 Close your browser. |
In this topic you enable some of the grid infrastructure features. Perform the following tasks:
| Enabling Oracle Restart | ||
| Move ASM spfile to ASM storage | ||
To Enable Oracle Restart, perform the following steps:
| 1. | Stop EM database control with
emctl stop dbconsole
 |
| 2. | Determine which components are running. The pgrep -lf <string> command work well for this.
 |
| 3. | Shutdown the database instance with
sqlplus / as sysdba
SQL> shutdown immediate
SQL> exit |
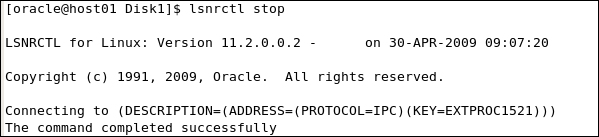
| 4. | Stop the listener with the command
lsnrctl stop
 |
| 5. | In a terminal window as the oracle user, set the environment to user the ASM home with . oraenv and enter the ORACLE_SID +ASM when prompted. |
| 6. | In the same terminal window, shutdown the ASM instance
sqlplus / as sysasm
SQL> shutdown immediate
SQL> exit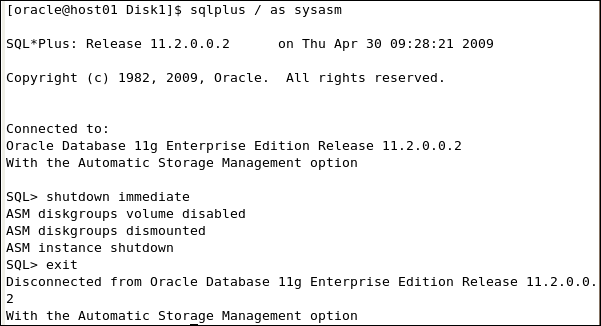 |
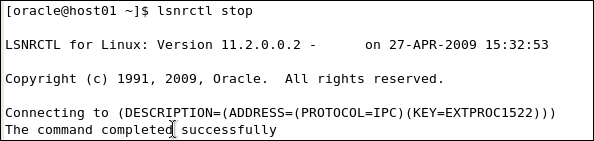
| 7. | In the same terminal window, stop the listener that was configured for the ASM instance with the command:
lsnrctl stop
 |
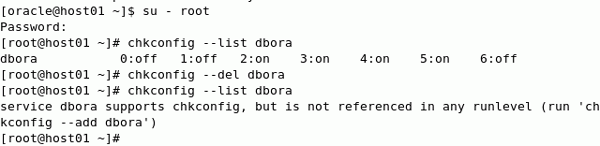
| 8. | The standard OBE environment automatically starts the database with the dbora service. The dbora service may not exist if you downloaded this OBE and configured your own environment. As the root user, remove the dbora service with the command:
su - root
chkconfig --del dboraUse the --list option to determine if the dbora service is configured
chkconfig --list dbora
 |
| 9. | Now that all the Oracle related processes are stopped reboot the machine In a terminal window as the root use the reboot command
reboot
 |
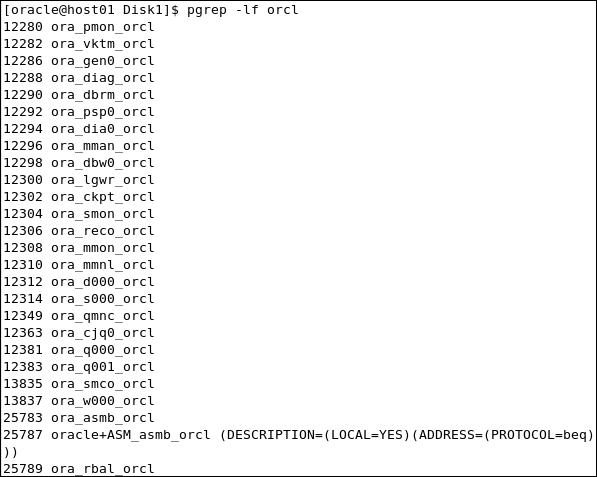
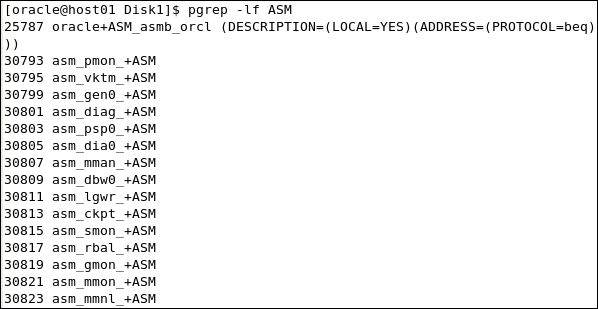
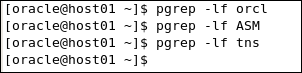
| 10. | Connect to the machine and Login As the oracle user are any of the Oracle related processes running. Use the pgrep -lf command to check. The listener started from the database home directory is the only Oracle related process running
pgrep -lf orcl
pgrep -lf ASM
pgrep -lf tns
 |
| 11. | Enable Oracle restart to automatically start the registered components with the crsctl command This command must be run from the grid ORACLE_HOME directory (this is the same directory as the ASM home). You can set this by running oraenv as shown below and setting the ORACLE_SID to +ASM.
. oraenv
crsctl enable has
 |
| 12. | Attempt to start Oracle Restart with the crsctl utility. This fails because the ohasd process is already running. It was configured to restart automatically at boot time during the grid Infrastructure installation. crsctl start has  |
| 13. | Remove the grid infrastructure listener from the Oracle Restart configuration with the following command:
 |
| 14. | Change the name of the grid infrastructure listener. The default name LISTENER cannot be the same as the database listener if both listeners will be registered with Oracle Restart.Edit the grid infrastructure listener.ora file at /u01/app/grid/product/11.2.0/grid/network/admin/listener.ora 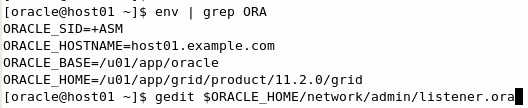 Change the name LISTENER to LISTENERASM.  |
| 15. | Add the grid infrastructure listener to the Oracle Restart configuration with the following command:
 |
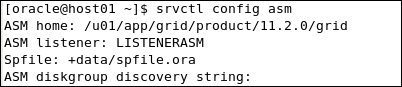
| 16. | Reconfigure the asm database in Oracle Restart to have a dependencies on the LISTENERASM. Use the commands listed below. Check the current configuration then modify it using the values shown in the configuration. Be sure to use your spfilename.

 |
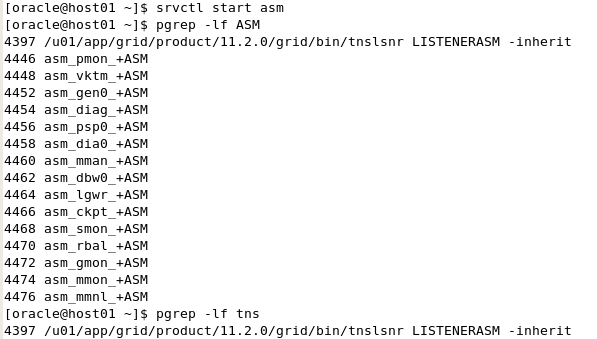
| 17. | Start the oracle grid components: listener, and asm, and then check that the +ASM instance and the LISTENERASM are running. Since they are configured in Oracle Restart, use the single command
 |
| 18. | Start the oracle database components: listener, database instance and EM database control.Change the environment to use the orcl instance ORACLE_HOME with  Start the listener with  Start the database with 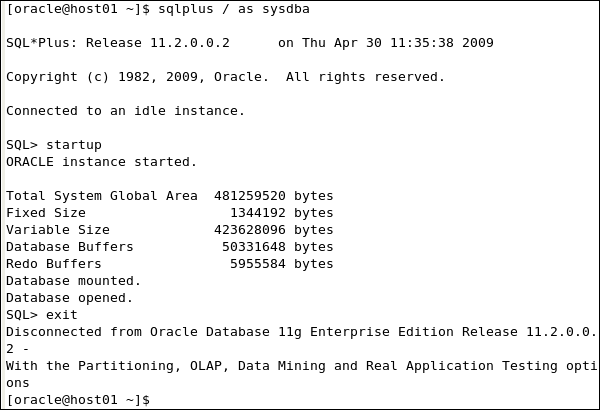
 |
| 19. | Enable Oracle Restart for the orcl database instanceStart EM database control at URL https://host01.example.com:1158/em  On the Specify Host Credentials page enter Username: oracle and Password:oracle  On the Confirmation: Register Database page, observe the command that will be executed, and then click Continue.  On the Database Home page, Oracle Restart now shows Enabled. 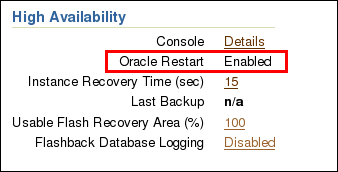 |
| 20. | Register the database listener with Oracle Restart.On the Database Home page, in the General section click the Listener name. 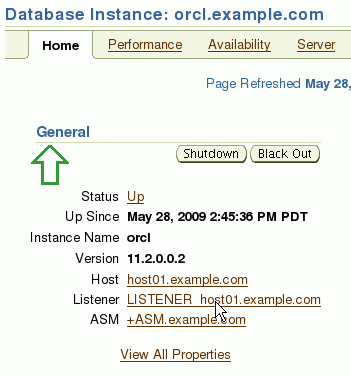
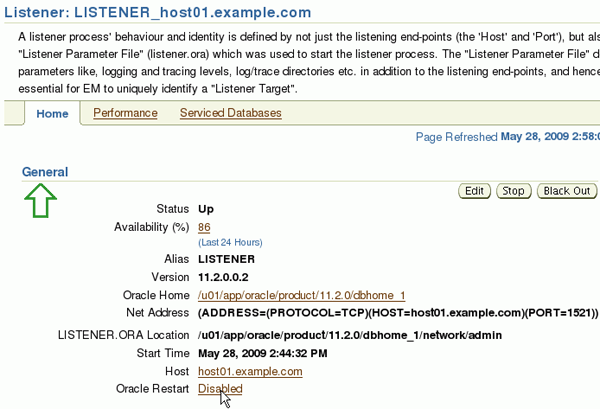
 The Processing page appears, then the Listener Home page. The listener is now Enabled for Oracle Restart. 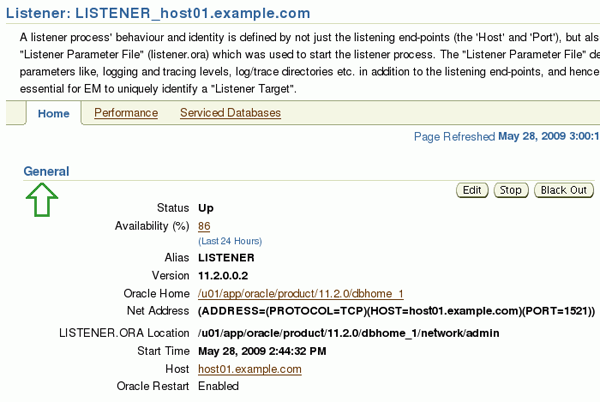 |
| 21. | In a terminal window as the oracle OS user, start the database with the command
srvctl start database -d orcl
|
| 22. | As the root user reboot the machine with the command su - root reboot |
| 23. | Observe the oracle components that are started automatically with the pgrep commands:


Check the EM database control status with the command
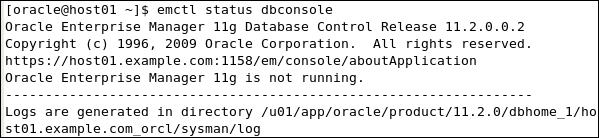
Because the EM database is not included in Oracle Restart, it must be started manually.
|
| 1. | The SPFILE for an ASM instance is in use anytime the ASM instance is active. The SPFILE can be copied with the spcopy command while the Instance is active. The spcopy command does not change which copy of the SPFILE is being used. The spmove command changes the Oracle Restart configuration so that the target SPFILE will be used on the next startup, and attempts to delete the source SPFILE. To move the SPIFLE the ASM instance must be stopped, this implies all instances using the ASM diskgroups must also be stopped Stop the database, and asm diskgroup, with the srvctl command;
 |
| 2. | Check the configuration of the asm instance, determine the current location of the SPFILE using the command
 |
| 3. | Move the SPFILE for the ASM instance out of the ASM file. The SPFILE for ASM is created in the ASM diskgroup by default with the Grid Infrastructure installation. To move the SPFILE out of the ASM diskgroup and into filesystem , use the ASMCMD command spmove. The ASMCMD utility requires that the ASM environment is set.
. oraenv

asmcmd
ASMCMD> spmove +DATA/spfile.ora /u01/app/grid/product/11.2.0/grid/dbs/spfile+ASM.ora |
| 4. | Stop and restart the ASM instance to use the SPFILE in the new location. Use the ASMCMD commands shutdown and startup. ASMCMD> shutdown ASMCMD> startup 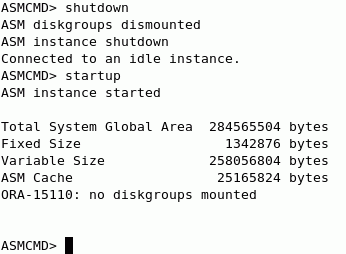 ASMCMD> mount DATA  |
| 5. | Retrieve the location of the SPFILE registered in Oracle Restart with the spget command. ASMCMD> spget ASMCMD> exit  |
| 6. | Using SQL*Plus commands, find the current location of the SPFILE. Connect to the ASM instance "as SYSASM"
sqlplus / as SYSASM
SQL> select sys_context('sys_cluster_properties','asm_spfile') from dual;
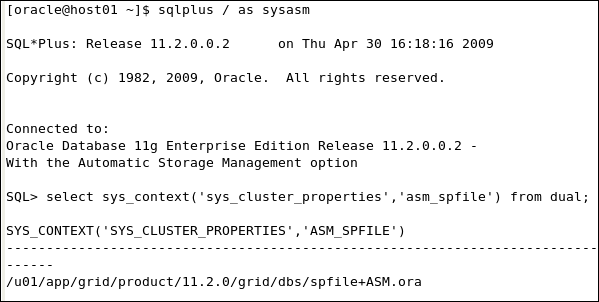 |
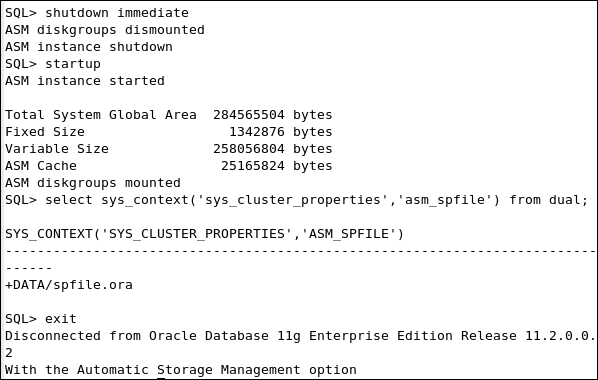
| 7. | Move the SPFILE into the ASM diskgroup using SQL*Plus command SQL> create SPFILE = '+DATA/spfile.ora' from memory;  |
| 8. | Restart the ASM instance to use the new SPFILE. SQL> shutdown immediate SQL> startup SQL> select sys_context('sys_cluster_properties','asm_spfile') from dual;
SQL> exit
 |
| 9. | Restart the orcl instance, and restore the status with the command
srvctl start database -d orcl
|
At this point the Grid infrastructure is in place to do the Managing the ASM Cluster File System (ACFS) tutorial. Please go to that tutorial, and return here when it is completed to cleanup the environment.
To return the OBE environment to the same state it was in at the beginning of this exercise, perform the following steps:
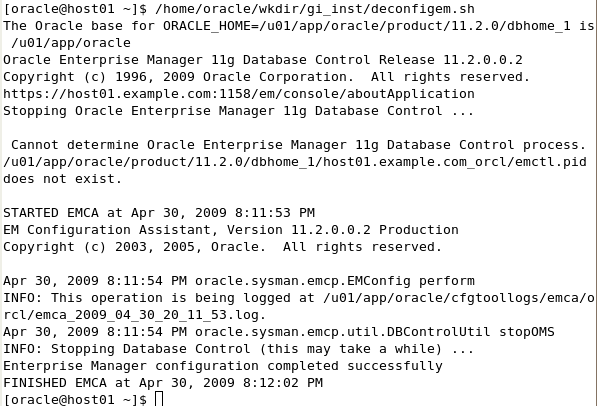
| 1. | In a terminal window as the oracle user, and environment set to the orcl instance, stop EM database control and deconfigure with
/home/oracle/wkdir/gi_inst/deconfigem.sh
 |
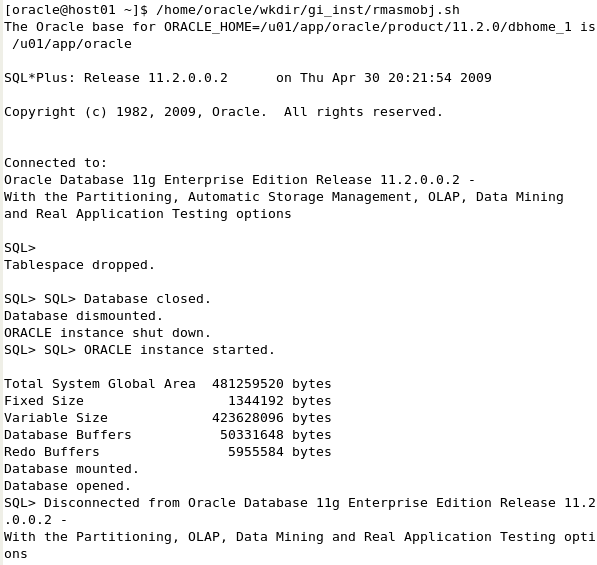
| 2. | Remove objects stored in ASM from database instance orcl.
/home/oracle/wkdir/gi_inst/rmasmobj.sh
 |
| 3. | Run the deinstall_gi.sh script remove the database and the database listener from the Oracle Restart configuration. /home/oracle/wkdir/gi_inst/deinstall_gi.sh You will recieve 4 prompts. The first is "Specify all Oracle Restart enabled listeners that are to be de-configured [LISTENERASM]:" Entercarriage return. The second is :"De-configuring ASM will drop all the diskgroups and it's contents at cleanup time. This will affect all of the databases and ACFS that use this ASM instance(s). If you want to retain the existing diskgroups or if any of the information detected is incorrect, you can modify by entering 'y'. Do you want to modify above information (y|n) [n]: " Enter carriage return The third is: "Do you want to continue (y - yes, n - no)? [n]:" Enter y. You will be prompted to run one or more scripts as root to complete the deinstallation. When prompted open a terminal and use the su - root command to become root. cut and paste the command from the deinstall script window to the root window and execute. |
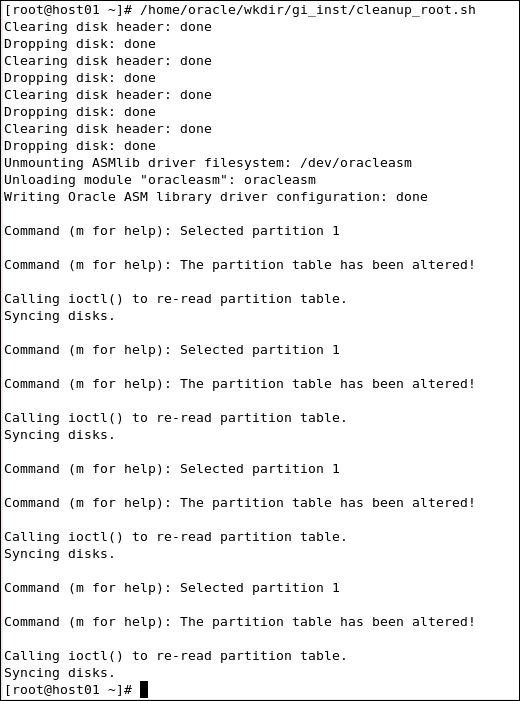
| 4. | As the root user run the following script
su - root
/home/oracle/wkdir/gi_inst/cleanup_root.sh
exit
 |
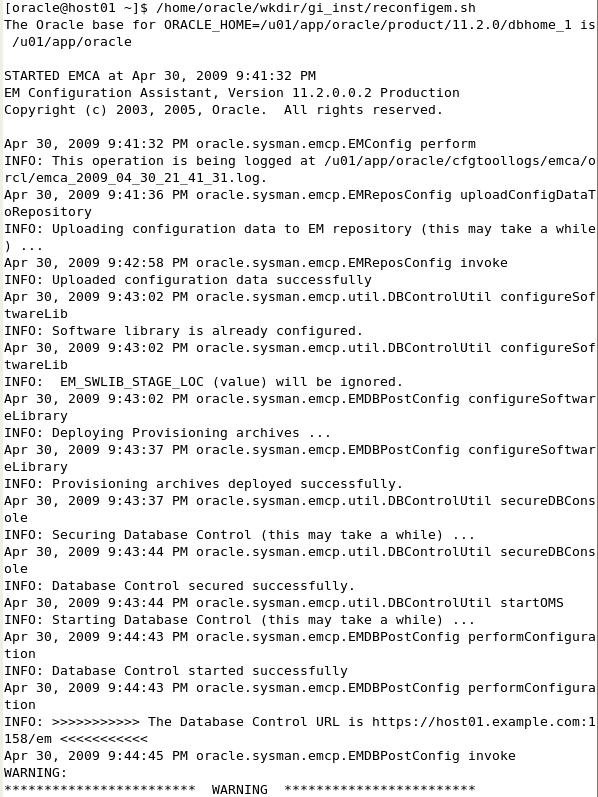
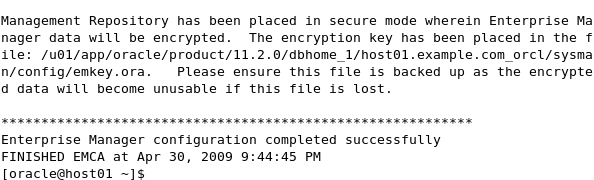
| 5. | As the oracle OS user, reconfigure EM database control with the command:
/home/oracle/wkdir/gi_inst/reconfigem.sh
  |
In this lesson, you learned how to:
| Prepare the storage devices for Grid Infrastructure installation | ||
| Install Grid Infrastructure | ||